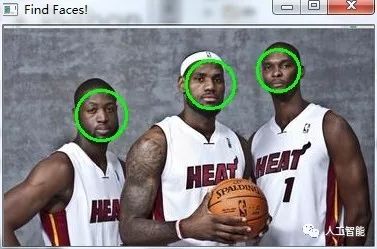
In the afternoon, the Python environment of OpenCV was equipped, and the Python environment of OpenCV was built. So I can't wait to experience opencv's face recognition, as follows. Haar-like Haar-like encyclopedia definition. In layman's terms, it can be used as a facial feature. The Haar eigenvalue reflects the gray level changes of the image. For example, some features of the face can be simply described by rectangular features, such as: the eyes are darker than the cheeks, the sides of the nose are darker than the bridges of the nose, and the mouth is darker than the surroundings. opencv api If you want to use opencv, you must first know what it can do and how to do it. So the importance of API is reflected. As far as this example is concerned, there are very few functions used, which means reading pictures, converting gray scales, displaying images, and simply editing images. as follows: Read picture Just give the path of the picture to be operated. import cv2image = cv2.imread(imagepath) Grayscale conversion The function of gray scale conversion is to reduce the calculation intensity of the picture converted into gray scale. import cv2gray = cv2.cvtColor(image,cv2.COLOR_BGR2GRAY) Drawing One embodiment of the power of opencv is that it can edit and process pictures at will. The last parameter of this function below specifies the size of the pen. import cv2cv2.rectangle(image,(x,y),(x+w,y+w),(0,255,0),2) Display image The edited image is either displayed directly or saved to a physical storage medium. import cv2cv2.imshow("Image Title",image) Obtain face recognition training data It seems complicated, but it is actually some description of the facial features, so that after reading the data, opencv can perceive the features on the read pictures according to the sample data in the training, and then perform face recognition on the pictures. import cv2face_cascade = cv2.CascadeClassifier(r'./haarcascade_frontalface_default.xml') The xml file shown here is the universally trained data shared by opencv on GitHub. We can use it directly. Training data reference address: https://github.com/opencv/opencv/tree/master/data/haarcascades Face detection To put it bluntly, it is the process of identifying new pictures based on the training data. import cv2 # Detect the face in the picture faces = face_cascade.detectMultiScale( gray, scaleFactor = 1.15, minNeighbors = 5, minSize = (5,5), flags = cv2.cv.CV_HAAR_SCALE_IMAGE) We can arbitrarily specify the values ​​of the parameters inside to achieve recognition under different accuracy. The return value is the embodiment of opencv's detection result of the picture. Processing the results of face detection After finishing the face detection just now, we can get the return value for further processing. But this is not to say how complicated it will be, it is nothing more than adding point eigenvalues. import cv2 print "{0} personal face found!".format(len(faces)) for(x,y,w,h) in faces: cv2.rectangle(image,(x,y),(x+w,y+w),(0,255,0),2) With the foundation just now, we can complete a simple small example of face recognition. Picture material The picture below will serve as our basis for testing. Face detection code # coding:utf-8 import sys reload(sys) sys.setdefaultencoding('utf8') # __author__ ='Guo Pu' # __date__ = '2016/9/5' # __Desc__ = A small example of face detection, circle the face import cv2 # Image path to be detected imagepath = r'./heat.jpg' # Get the parameter data of the trained face, here use the default value directly from GitHub face_cascade = cv2.CascadeClassifier(r'./haarcascade_frontalface_default.xml') # Read picture image = cv2.imread(imagepath) gray = cv2.cvtColor(image,cv2.COLOR_BGR2GRAY) # Detect the face in the picture faces = face_cascade.detectMultiScale( gray, scaleFactor = 1.15, minNeighbors = 5, minSize = (5,5), flags = cv2.cv.CV_HAAR_SCALE_IMAGE ) print "{0} personal face found!".format(len(faces)) for(x,y,w,h) in faces: # cv2.rectangle(image,(x,y),(x+w,y+w),(0,255,0),2) cv2.circle(image,((x+x+w)/2,(y+y+h)/2),w/2,(0,255,0),2) cv2.imshow("Find Faces!",image) cv2.waitKey(0) Face detection results Output picture: Output result: D:\Software\Python2\python.exe E:/Code/Python/DataStructor/opencv/Demo.py Found 3 faces! To recap, this experiment is simply the use of opencv's commonly used APIs, focusing on the use of training data and the processing of face detection.
Graphic overlays are thin films printed as the top layer of a product.
They apply printed graphics and text to label controls to provide instructions or safety warnings while serving one or two purposes: a decorative layer or a functional layer.
China Graphic Overlays, Flexible Membrane Switch Graphic Overlay manufacturer, choose the high-quality Membrane Switches Graphic Overlays, Graphic Overlay Membrane Switch Module, etc.
Graphic Overlays,Flexible Membrane Switch Graphic Overlay,Membrane Switches Graphic Overlays,Graphic Overlay Membrane Switch Module KEDA MEMBRANE TECHNOLOGY CO., LTD , https://www.kedamembrane.com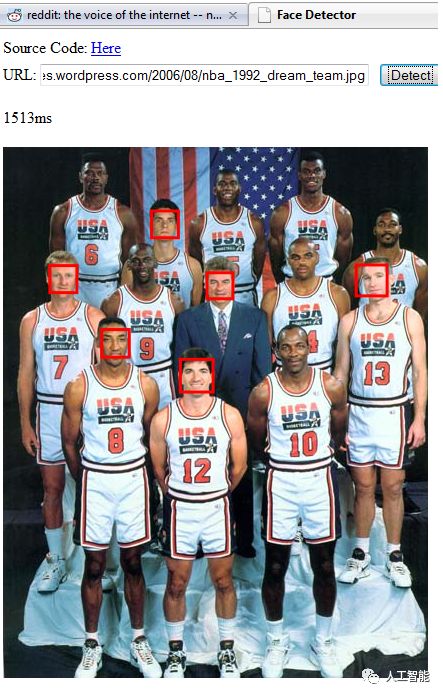

In the afternoon, the Python environment of OpenCV was equipped, and the Python environment of OpenCV was built. So I can't wait to experience opencv's face recognition, as follows.
Face recognition implementation scheme based on OpenCV and Python
Essential knowledge