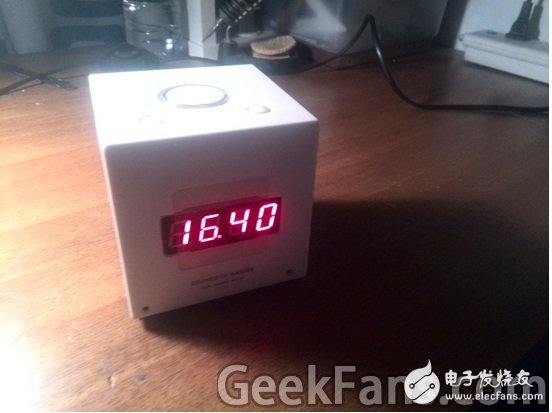
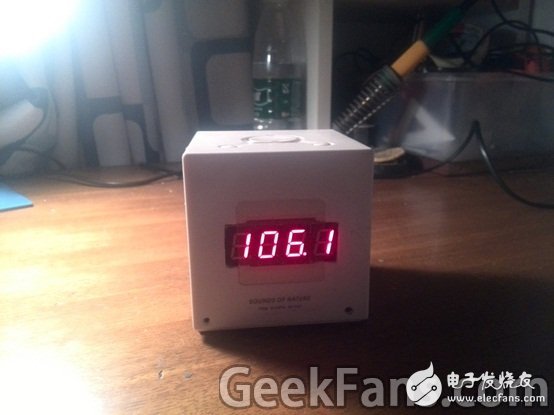
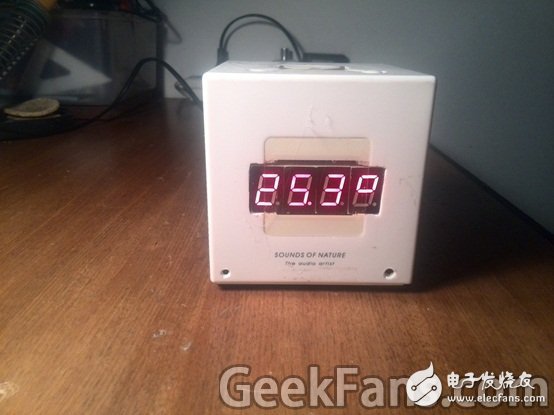
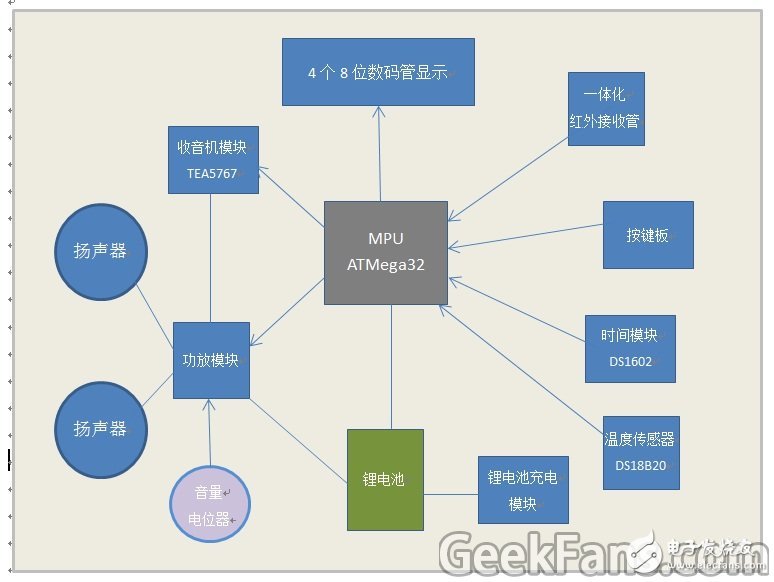
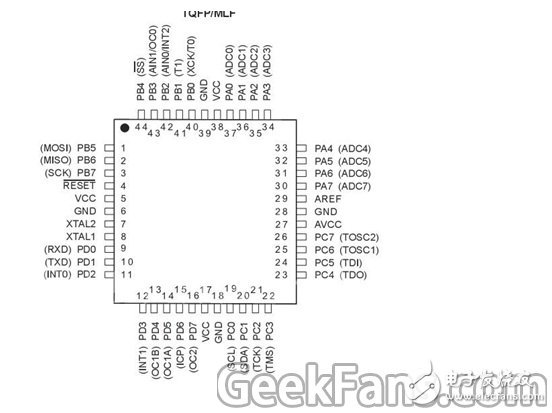
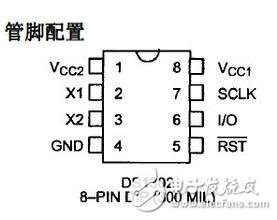
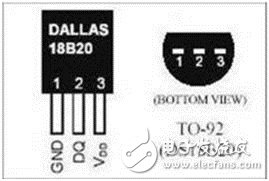
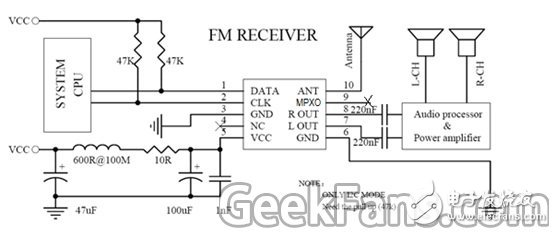
Using the broken radio shell and speaker, I made a multifunctional radio by myself with a single-chip microcomputer and a radio module. First look at the effect, and then talk about the production method. The production method is described below: 1. Material Broken radio shell: with button board, speaker MCU AVR ATMega32 Temperature sensor DS18B20 Time module DS1302 Integrated infrared receiver tube Radio module TEA567 Power amplifier module PAM8403 4 8-bit digital tubes Lithium battery of the original radio Lithium battery charging board Double potentiometer 100K Hole board, resistance, capacitance, inductance, several wires 2. Process Circuit schematic The pins of ATMega32 used are as shown in the figure below a) The production of digital tube display Adopt 4 independent common cathode digital tubes. The corresponding anodes are connected, and each anode is limited to 200 ohms after connection. PB7-PB0: Corresponding to the anode ah of the digital tube, the high potential is turned on. PA0-PA3: The cathode of the corresponding segment is from high position to low position. Low potential turns on. b) Connection of time module Vcc2 -> VCC X1, X2-》32K crystal Vcc1-》3V battery SCLK-》PC7 RST-》PC5 c) Connection of temperature sensor DQà PA5: Pull up with 4.7K resistor d) Connection of infrared receiver OUT-》PA4: Pull up with a 10K resistor e) Connection of the key board Play: PC2, input without pull-up resistor LED light: PC3, high light Other keys: PA7, ADC input Menu: ADC value 15~25 Volume: ADC value 200~230 Volume down: ADC value 420~460 Previous: ADC value 305~340 Next: ADC value 95~125 f) Connection of radio module I2C interface: PC0 (SCL): set output, pull-up resistor 47K PC1 (SDA): setting input, pull-up resistor 47K Power amplifier: PAM8403 small board, TEA5767's LOUT and ROUT are respectively connected to 100K resistors through 1uF capacitors, and then connected to a 100K dual potentiometer, the other end of the potentiometer is grounded, and the middle end of the potentiometer is respectively connected to the R and L of the PAM8403 small board. The speakers are respectively connected to the output of the PAM8403 small board. g) Play music PD4 (OC1B)-right channel: Connect 1M to PD4, string 470K to ground, and take the midpoint of the voltage to avoid too loud. PD5 (OC1A)-left channel: Connect 1M to PD4, string 470K to ground, and take the midpoint of the voltage to avoid too much sound. The midpoint of PD4 and PD5 is connected to the output terminals LOUT and ROUT of the TEA5767 radio. h) Connection of sound sensor The microphone is connected to a 10K resistor, the midpoint is amplified by 104 and 9014, and then output to PA6 for collection. PA6: ADC input 3. Realized functions Turn on the switch, display "HELO", and then automatically enter mode 1 (time mode) There are 6 modes, which can be switched at any time by pressing the Menu button on the remote control or radio. Mode 1: Time mode, display [[]] u Automatically display the current hour and minute when entering u Press left to display temperature u Press the right button to display the month and day u Press the volume plus to display the current second and week u Press the volume down to display the timing, starting from 0 to 999, the automatic sound reminder. u Press the Play button to display the current hour and minute Mode 2: Radio mode, display oOoO When entering, the last radio station is played, and the frequency of the current radio station is displayed in M ​​units. Press the left button to switch to the previous radio station Press the right button to switch to the next radio station Press the up button to fine-tune and increase the frequency, each time an increase of 0.01M Hz Press the key to fine-tune to reduce the frequency, each time 0.01M Hz Press the Play button to mute, press again to unmute Mode 3: Music mode, display Play Display the number of the first song when entering, 001 Press the left button to switch to the previous song, if it reaches the end, it will loop to the last song Press the right button to switch to the next song, if it reaches the end, it will cycle to the first song Press the Play button to play the song, press it again to pause, and then press to continue playing. If the playback is complete, the song number will be displayed. During the playback process, press other keys to terminate the playback. Press remote control 1 to play note 1, and so on. Press the volume up to increase by 1 octave, and press the volume down to decrease by 1 octave. The horizontal line that shows the first position indicates the pitch of the pitch. Press the 8 key to automatically switch to the higher note 1 Press the 0 key to automatically switch to the lower note 7 Mode 4: Timer mode, display Alert It displays 00.00 when entering, Press the left button to decrease the timing minutes Press the right button to increase the timing Press the up button to increase the timing seconds Press the key to decrease the timing seconds After setting the timer time, press Play to start the countdown. When the time is 0, it will be prompted by voice. Mode 5: Set time mode, display SetT The year is displayed when entering, it is possible to press the up and down keys to increase and decrease the year Press the left and right keys to switch the set month, day, week, hour, minute, and second, After all the time is set, press the Play button to save it to the system, and the system will start timing according to the new time. Mode 6: Radio search mode, display _-_-_- When entering, display the current radio station in radio mode, Press the left button to search for a small frequency, and stop when it finds a signal Press the right button to search in the direction of higher frequency until the signal is found and stop Press the up button to fine-tune and increase the frequency, each time an increase of 0.01M Hz Press the key to fine-tune to reduce the frequency, each time 0.01M Hz Press the Play button to save the current radio station frequency, and press it again to delete the current radio station frequency. The volume is adjusted by the upper potentiometer knob. Iget Legend,Iget Legend Puffs,Iget Vape,Disposable Iget Shenzhen Zpal Technology Co.,Ltd , https://www.zpal-vape.com